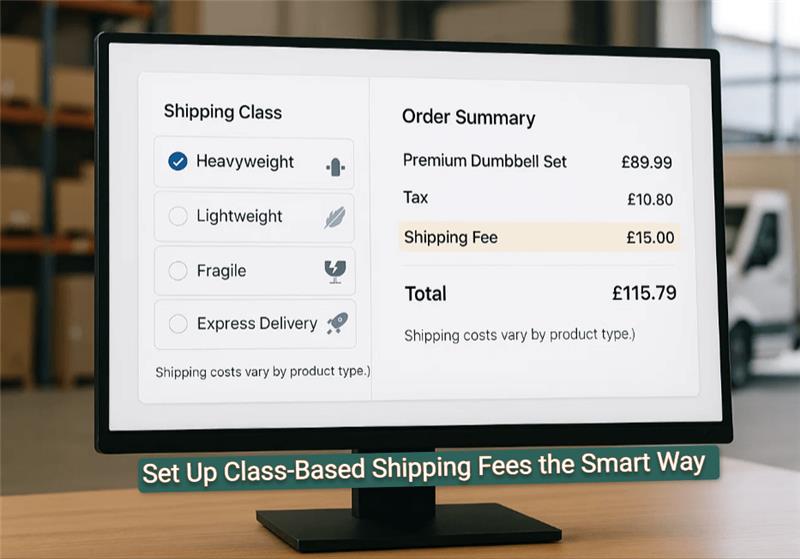
One of the most important details of the customer experience at WooCommerce checkout is having transparent shipping options. Shipping can be complicated in many cases, particularly when handling various types of products. They require separate handling with accurate shipping charges. This is where the WooCommerce shipping classes come in.
WooCommerce shipping classes allow store owners to categorize products into groups and set distinct shipping costs for each class. This makes offering small and light, fragile, or heavy products easier with shipping classes.
In this article, we’re going to share with you a step-by-step process for setting up class-based shipping fees on your WooCommerce store. This will make your store’s shipping process more efficient and customized. It will surely benefit both you and your customers.
What Are WooCommerce Shipping Classes?
WooCommerce shipping classes are a great way to categorize products based on their similar shipping requirements. Each class is a collection of your shipping rules, which you can use to effectively administer your shipping costs.
You might have a "Heavy Items" category for large products that incur higher shipping costs, or a "Fragile Items" category for products that require special care during packaging.
How WooCommerce Shipping Classes Work
You can apply shipping classes to different products, which are added to the shipping rules for various products. Let's say a customer purchases products from multiple woocommerce shipping classes. In that case, a dynamic calculation is applied to determine the shipping cost for each product based on its class.
Let's say a customer added a breakable item to their shopping cart along with a heavy item. Therefore, WooCommerce calculates the shipping cost based on each item’s class, ensuring pricing is as accurate as possible.
Benefits of Using Shipping Classes
You can easily categorize products based on shipping classes to fit different business scenarios. Let’s take a look at some core benefits of using WooCommerce shipping classes:
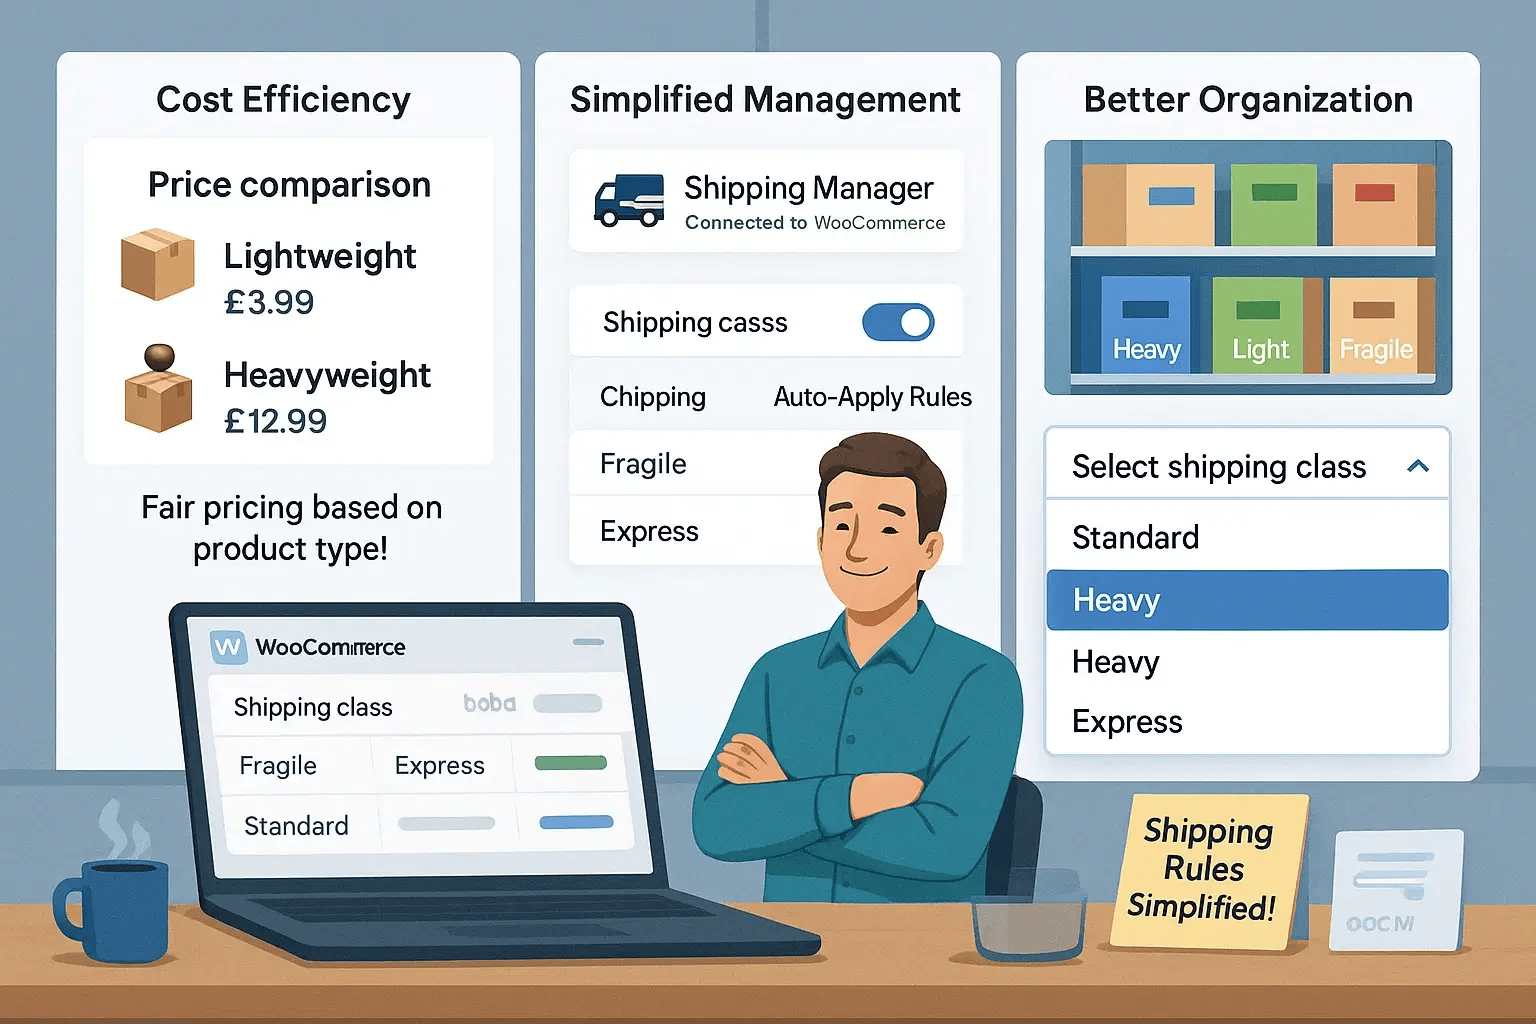
Ensuring Cost Efficiency: WooCommerce Shipping classes enable the offering of different shipping costs for various product types. For instance, lightweight goods will be cheaper to send since they are less bulky.
However, heavier items can be more expensive than lighter ones. This way, customers are billed accurately for the product they're buying. Additionally, they receive extra information as needed.
Enabling Better Organization: WooCommerce Shipping classes categorize products based on their shipping requirement. This helps store owners manage shipping settings more efficiently and quickly. It is especially beneficial if you have a vast stock and are involved in shipping products to multiple destinations.
Simplified Shipping Management: Custom shipping methods can be applied to product groups using WooCommerce shipping classes. This reduces the hassle of manually setting rates on a per-product basis. Additionally, it enables a simpler and automated shipping process.
In summary, WooCommerce shipping classes provide a straightforward way to modify shipping fees in WooCommerce. It can ease any complex shipping process for both vendors and customers.
Setting Up Shipping Classes in WooCommerce
Creating WooCommerce shipping classes is pretty simple and can make your store’s shipping process more manageable. You can use it to group products of a similar type and utilize it to perform tasks such as calculating shipping rates based on the shipping class.
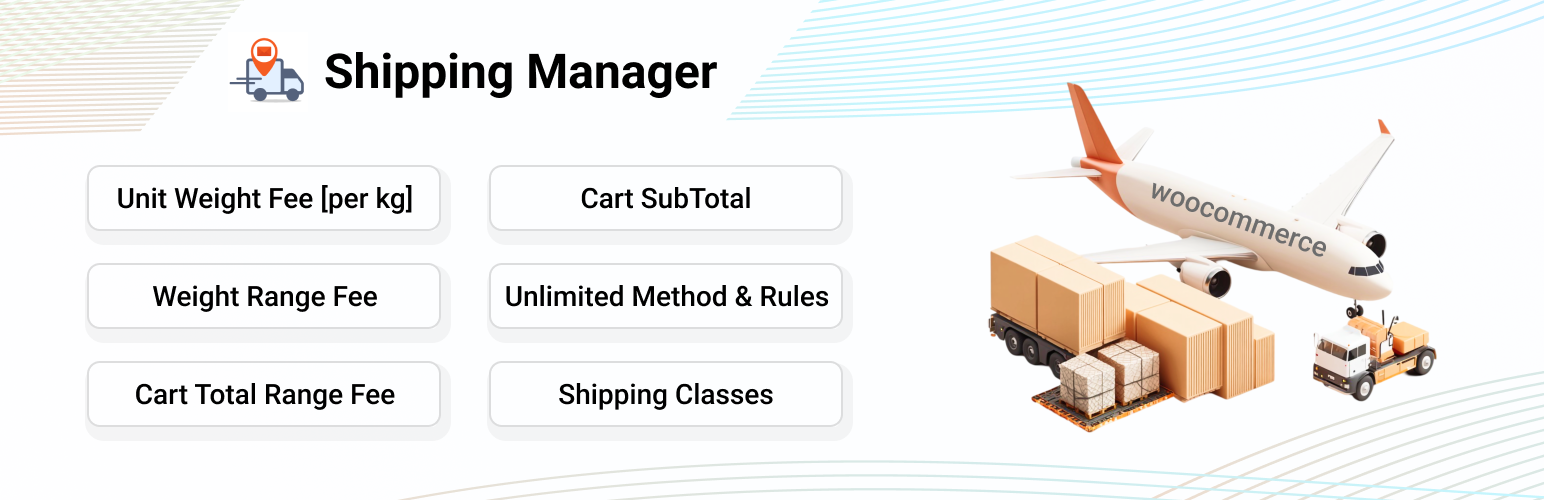
However, things become problematic when the store becomes large and has complex requirements. WooCommerce has a paid plugin to manage class-based shipping with advanced options. We are offering a free option named Shipping Manager - Table Rate, Weight-Based, and WooCommerce Advanced Shipping.
Here is how to add shipping classes without any paid option while using the Shipping Manager plugin for WooCommerce stores:
Creating WooCommerce Shipping Classes
Shipping classes allow you to group products with similar shipping requirements, making it easier to set accurate shipping fees. Here's how to create them:
Go to WooCommerce Settings:
Navigate to WooCommerce → Settings → Shipping → Shipping Classes in your WordPress dashboard.
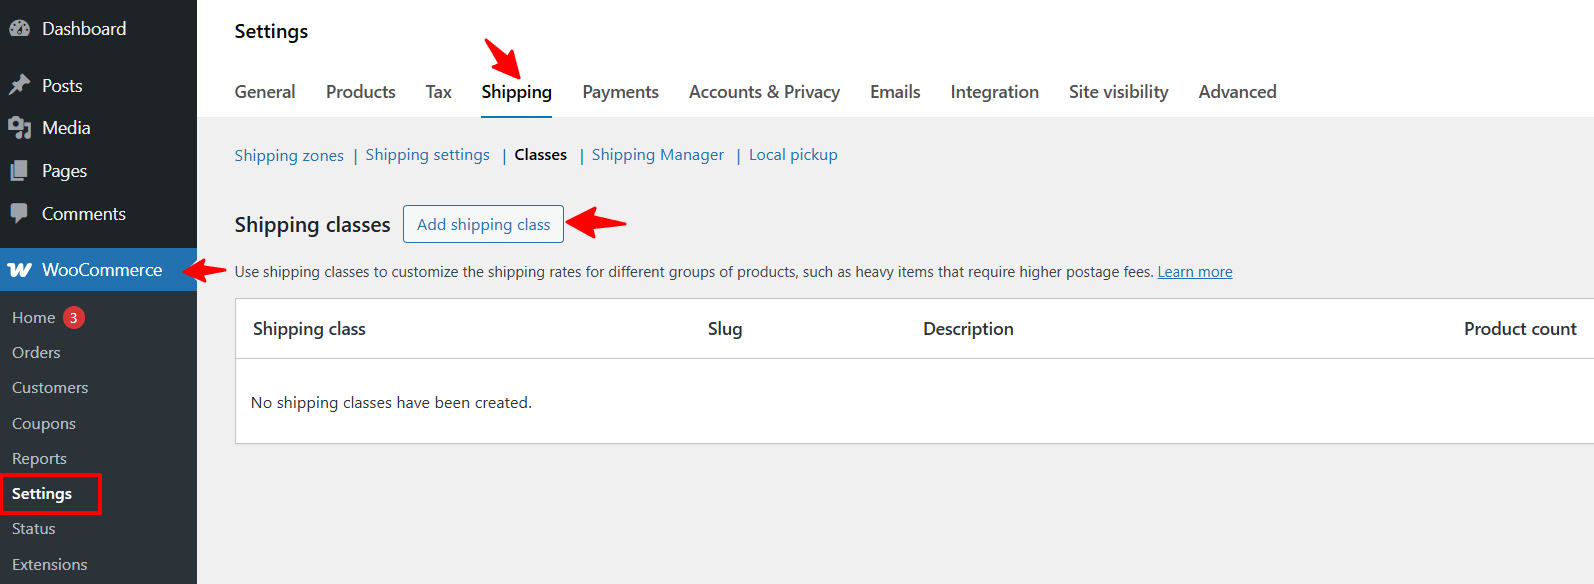
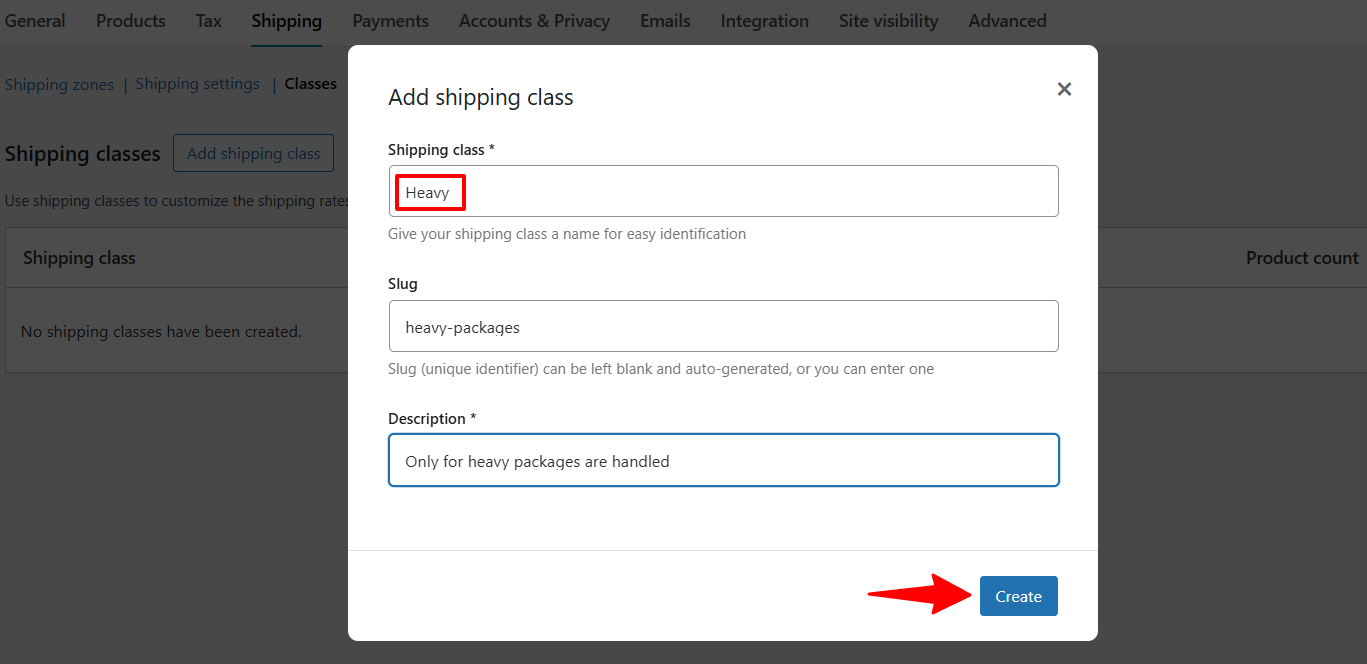
Add New WooCommerce Shipping Classes:
-
Click the "Add Shipping Class" button.
-
Enter a Name (e.g., "Heavy," "Light," "Fragile").
-
The Slug will auto-generate, but you can add it if needed.
-
Add a Description (optional but helpful for organization).
-
Click "Create" to save each shipping class.
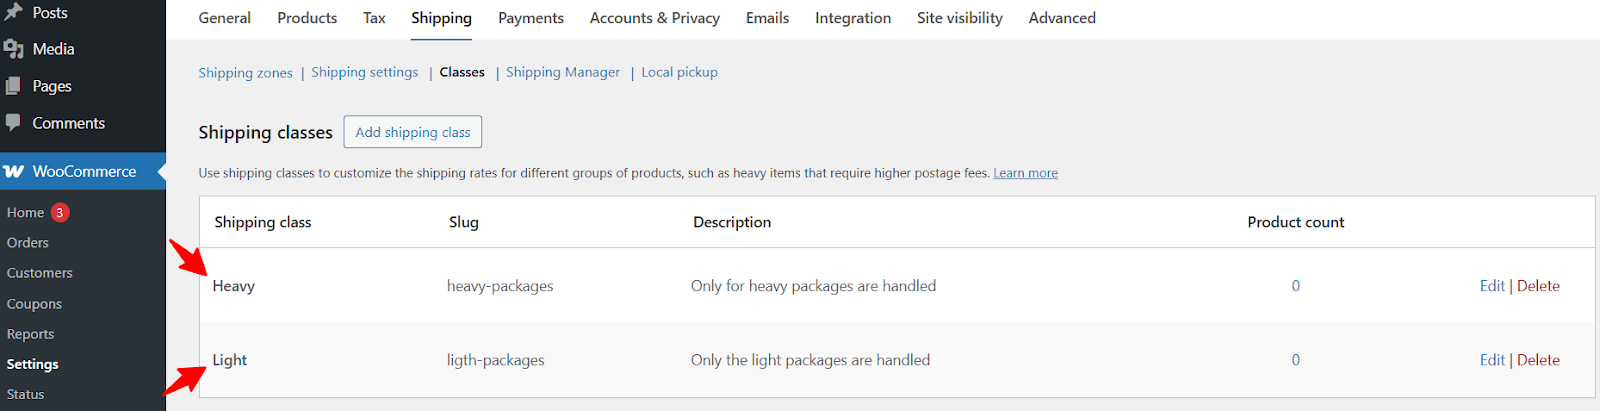
Now that your WooCommerce shipping classes are set up, the next step is assigning them to your products.
Creating Variable Products and Assigning Classes
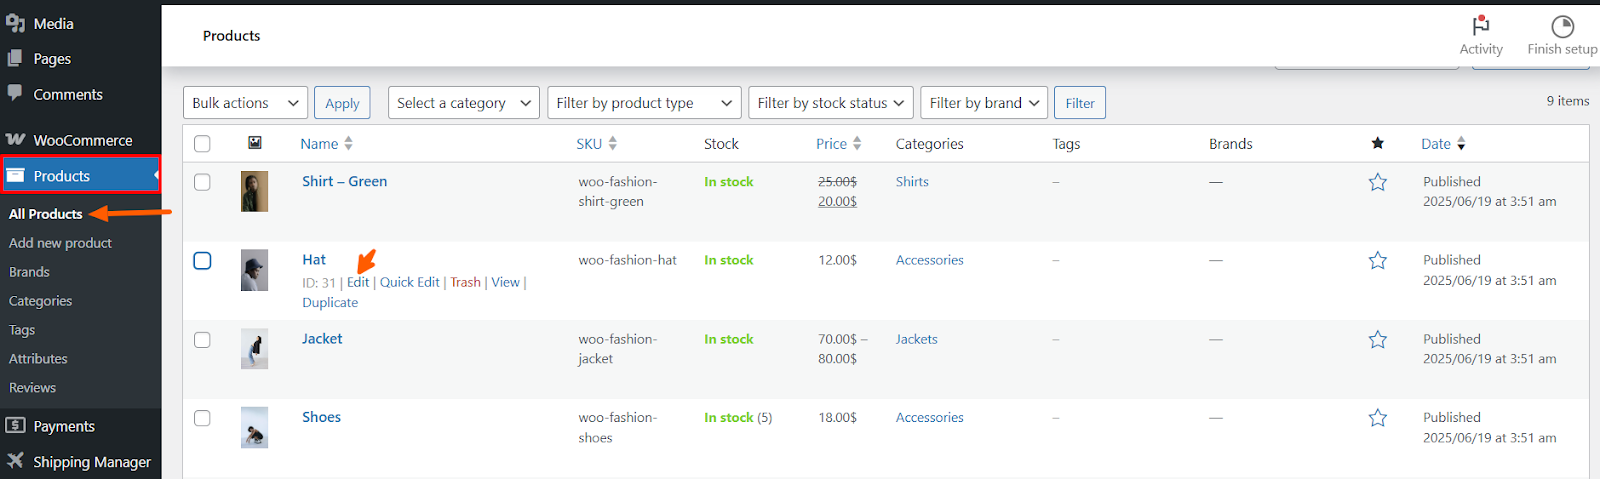
After creating WooCommerce shipping classes, you need to assign them to relevant products to apply the correct shipping fees.
Edit a Product to assign a shipping class:
-
Go to Products → All Products and select a product to edit.
-
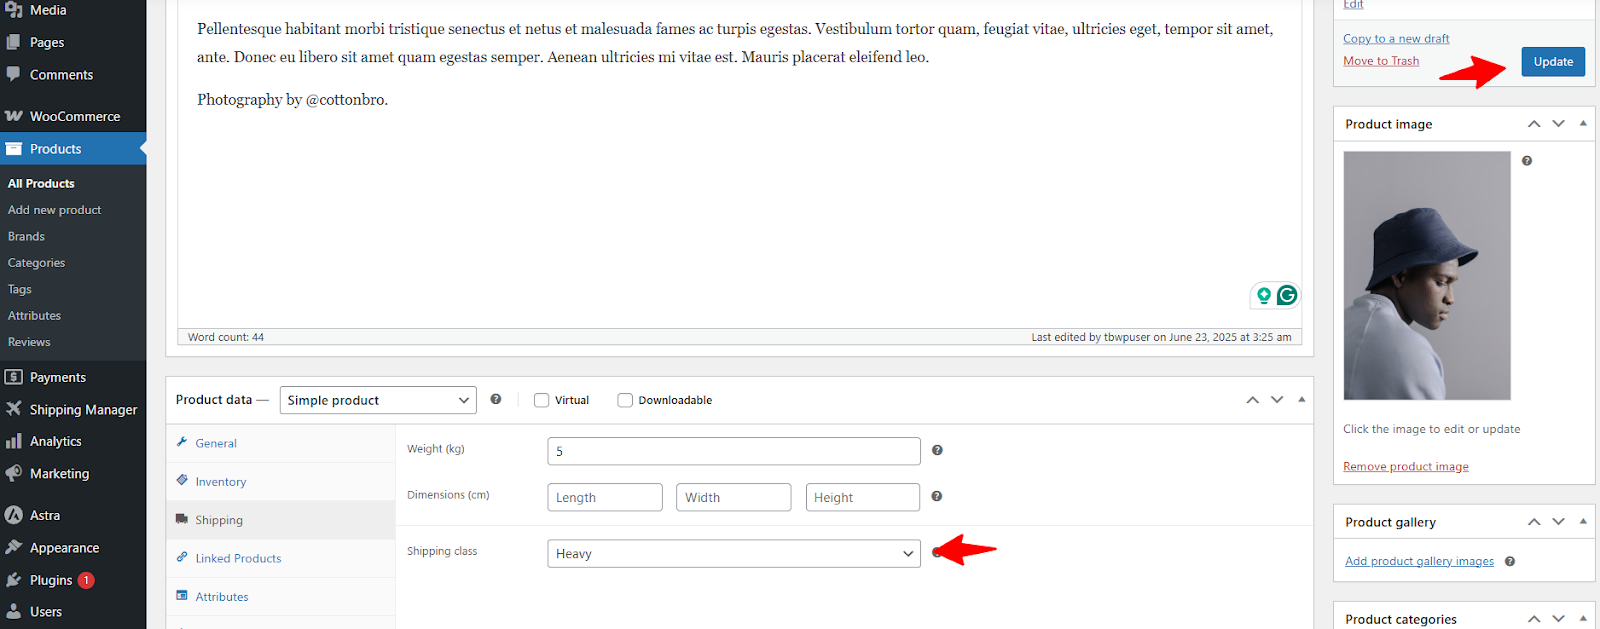
Scroll down to the "Shipping" tab in the product editor.
-
From the dropdown, select the appropriate shipping class (e.g., "Heavy" for large items, "Light" for small products).
-
Click "Update" to apply the shipping class to the product.
For Variable Products (e.g., different sizes/weights):
-
Change the product type to "Variable product."
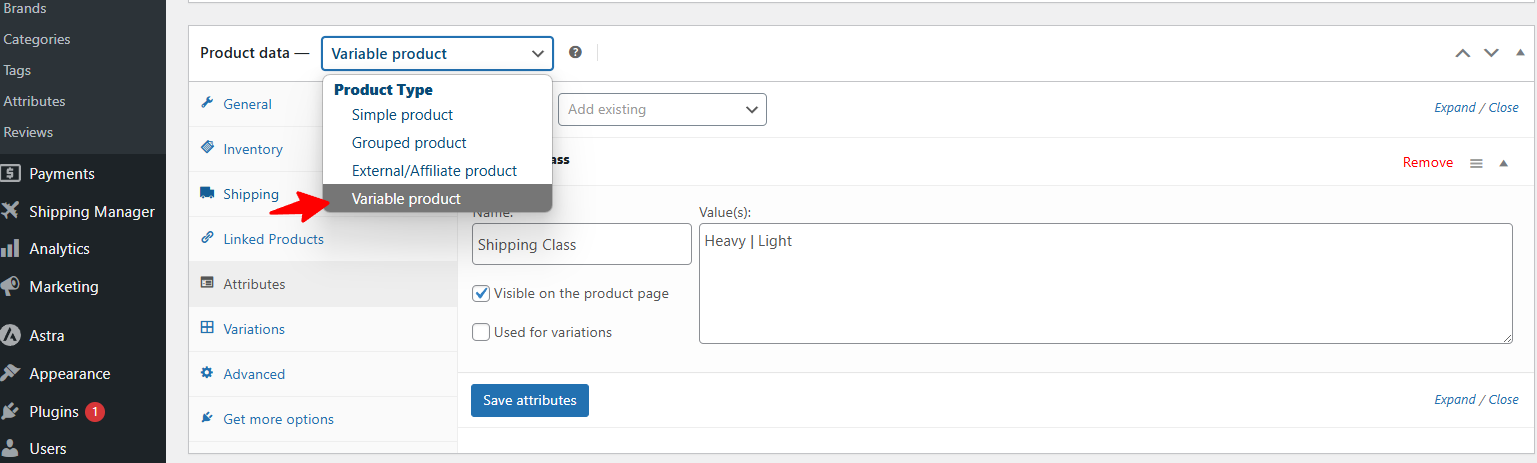
-
Under "Attributes," add options like "Weight: Heavy, Light."
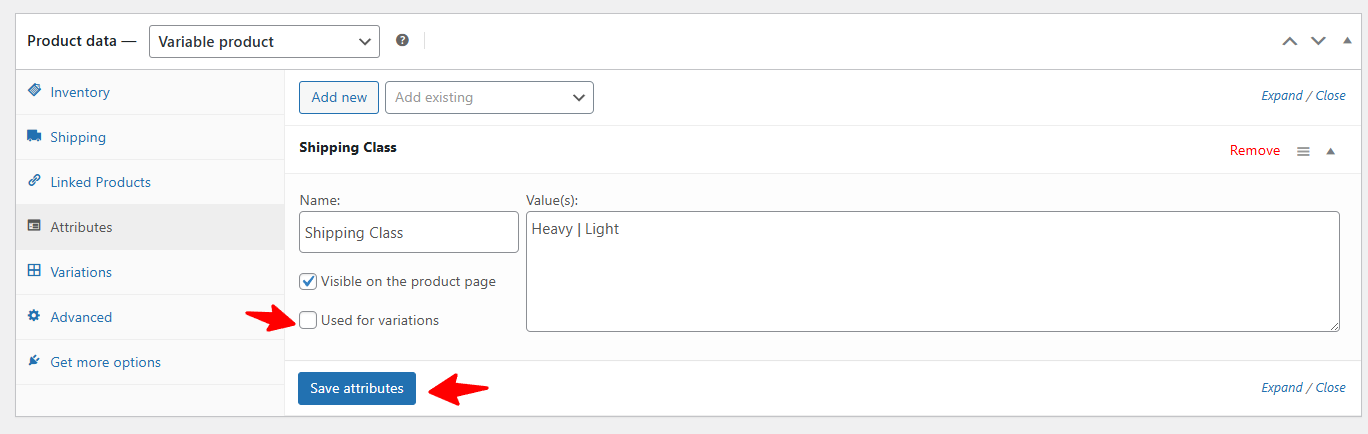
-
Then, place a tick mark on 'Used for variation' and click the 'Save attributes' button.
-
Now, click the "Generate Variations" button in the "Variations" tab to make variations based on the attributes.
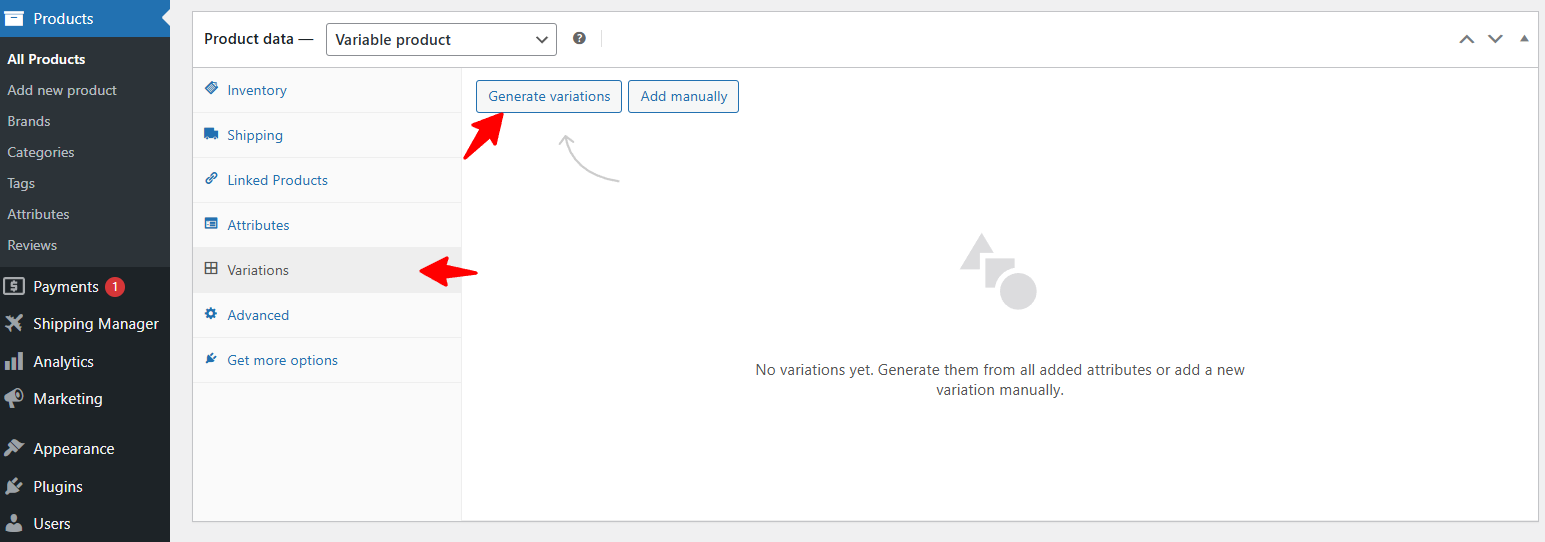
-
Generate variations and assign different WooCommerce shipping classes to each.
-
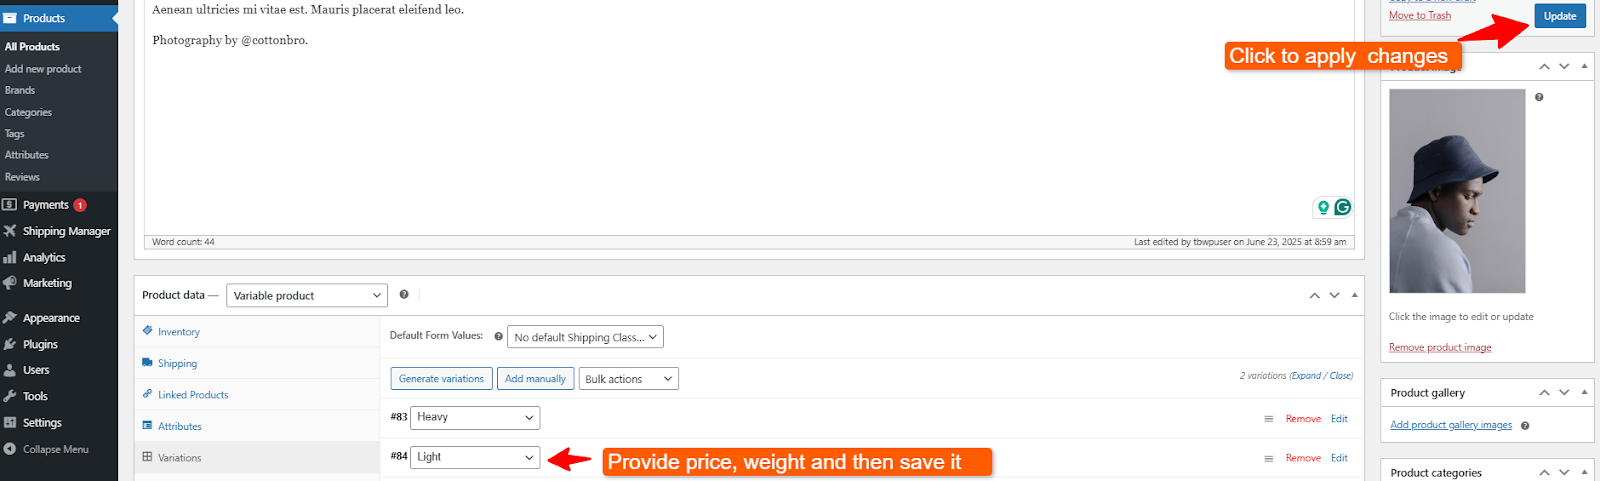
Enter the information required in the variation, such as price and weight value.
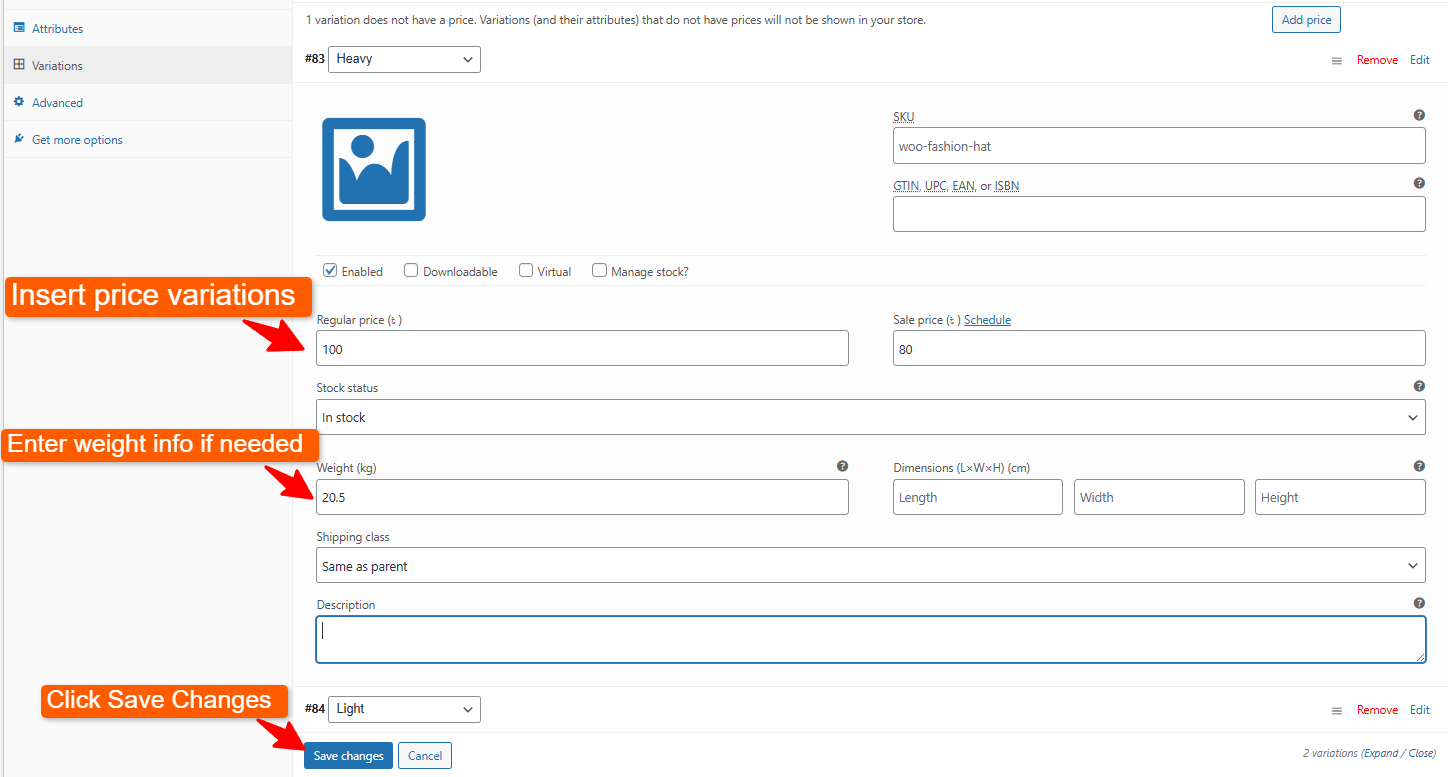
-
Click the Save Changes button.
-
Add information to another version called Light in the same way, and then click Update.
Once products are assigned to WooCommerce shipping classes, you can configure the actual shipping fees.
Configuring WooCommerce Shipping Class on Shipping Manager
Now that products are categorized, you can define shipping costs for each class within your shipping zones.
Set Up Shipping Zones (If Not Done Already):
-
Go to WooCommerce → Settings → Shipping.
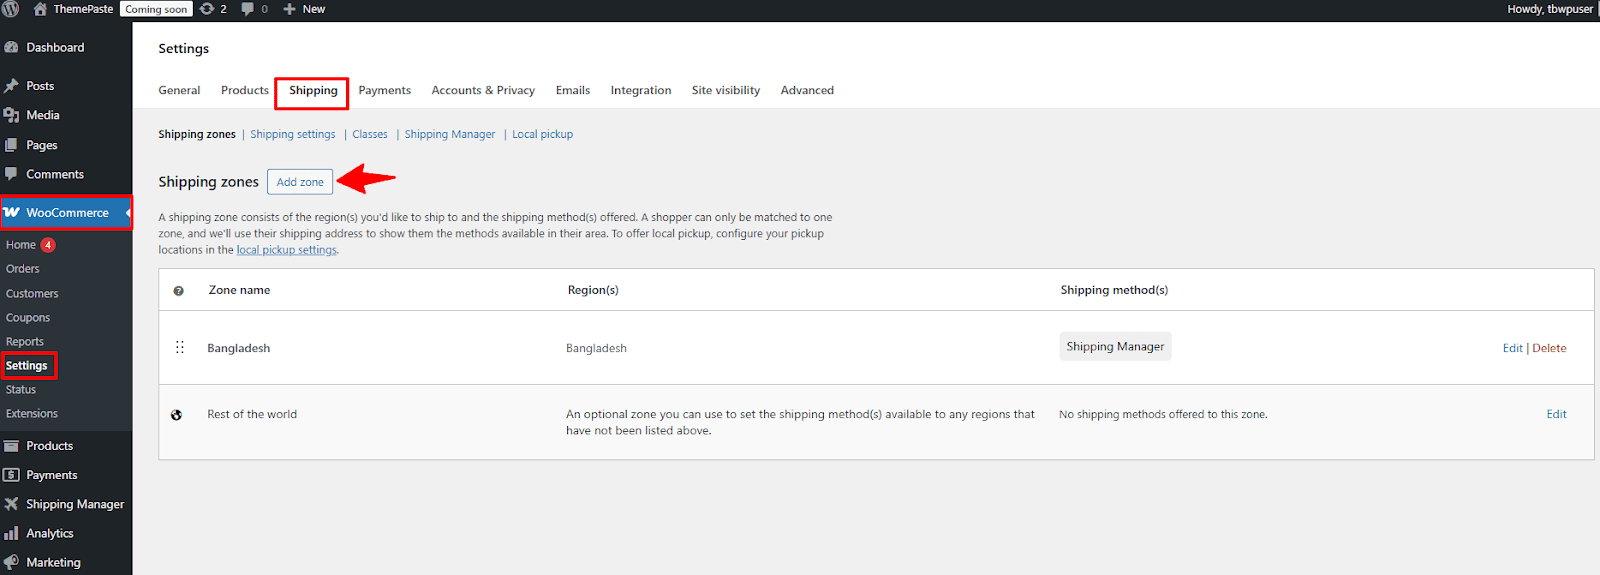
-
Click "Add Zone" (e.g., "Florida") and define the Zone Name's regions (states, ZIP codes, etc.).
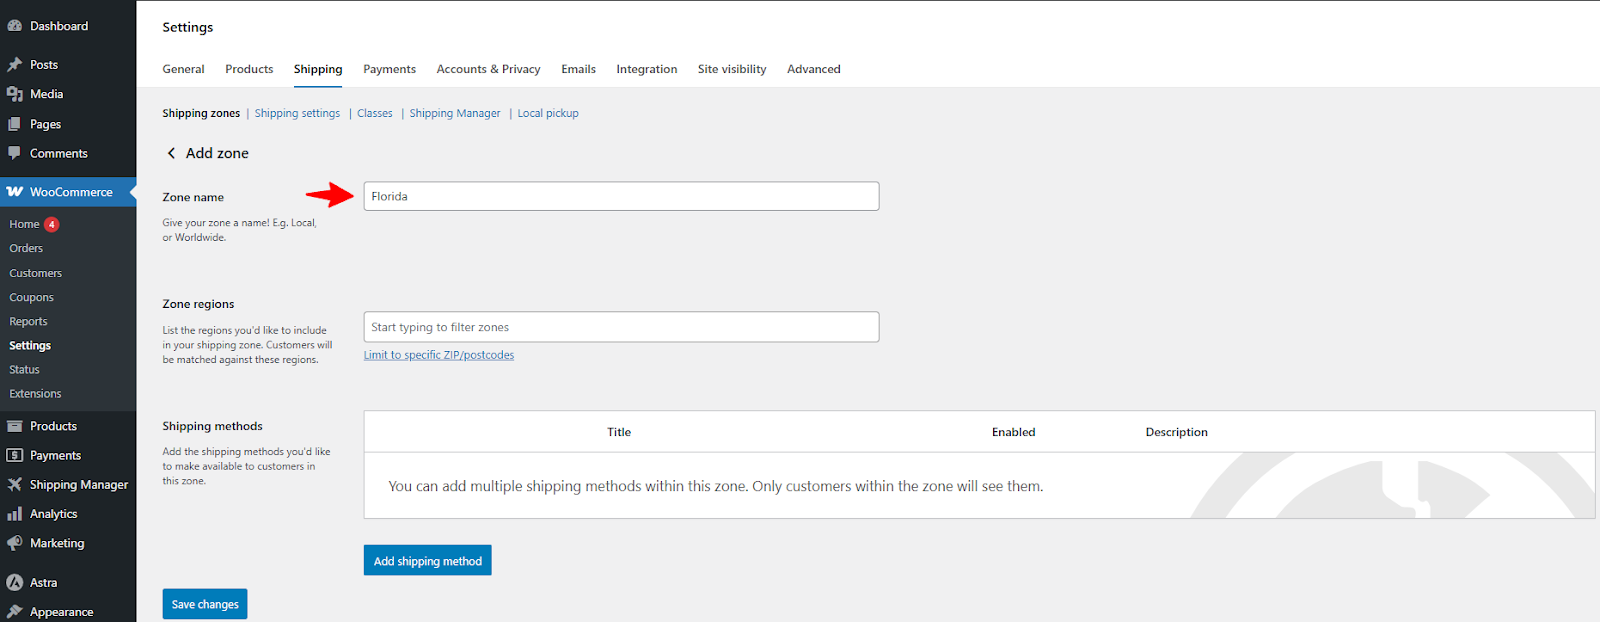
-
After that, click on the Zone regions menu.
-
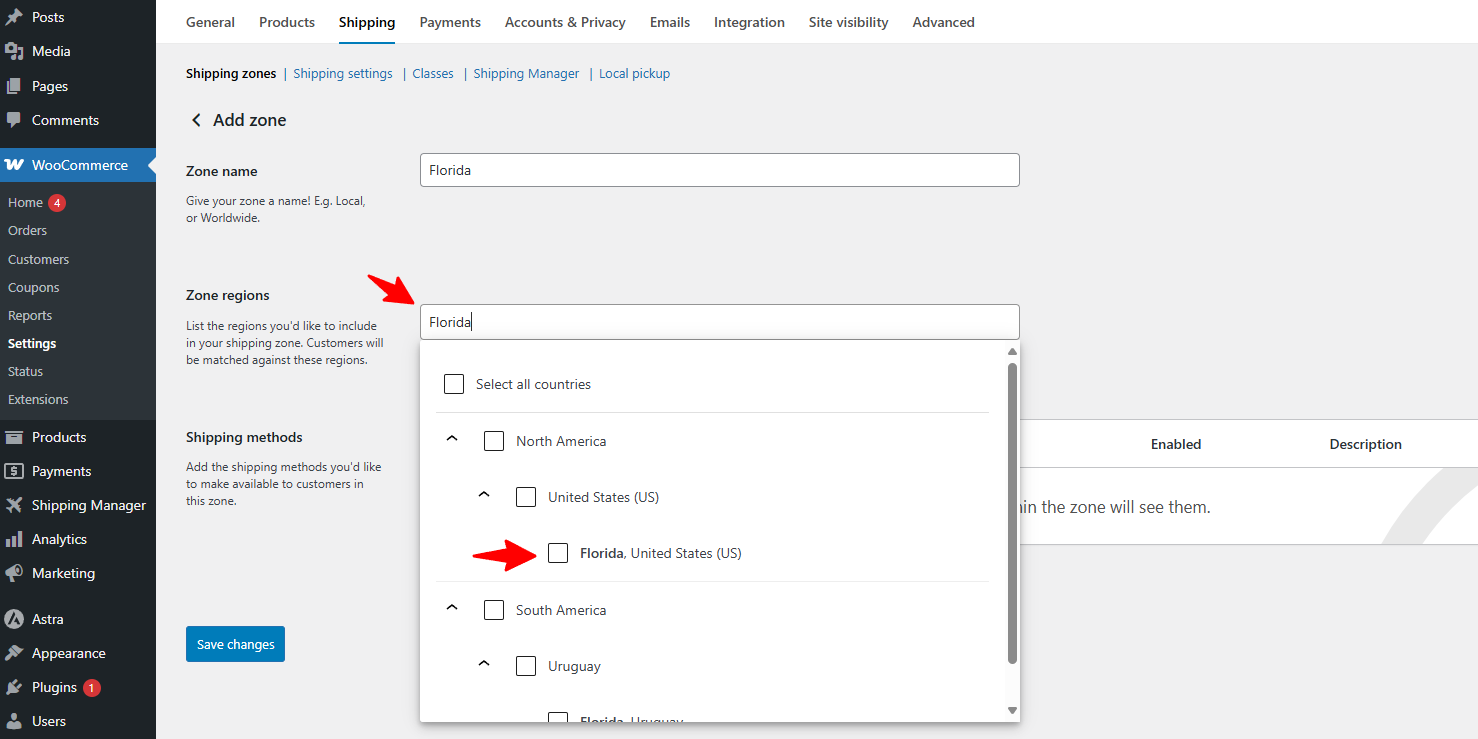
Type your zone region in the box
-
And then click next to the zone region.
-
Now, click Save Settings to save the changes you’ve just made.
Add a Shipping Method:
-
Inside your zone, click "Add Shipping Method."
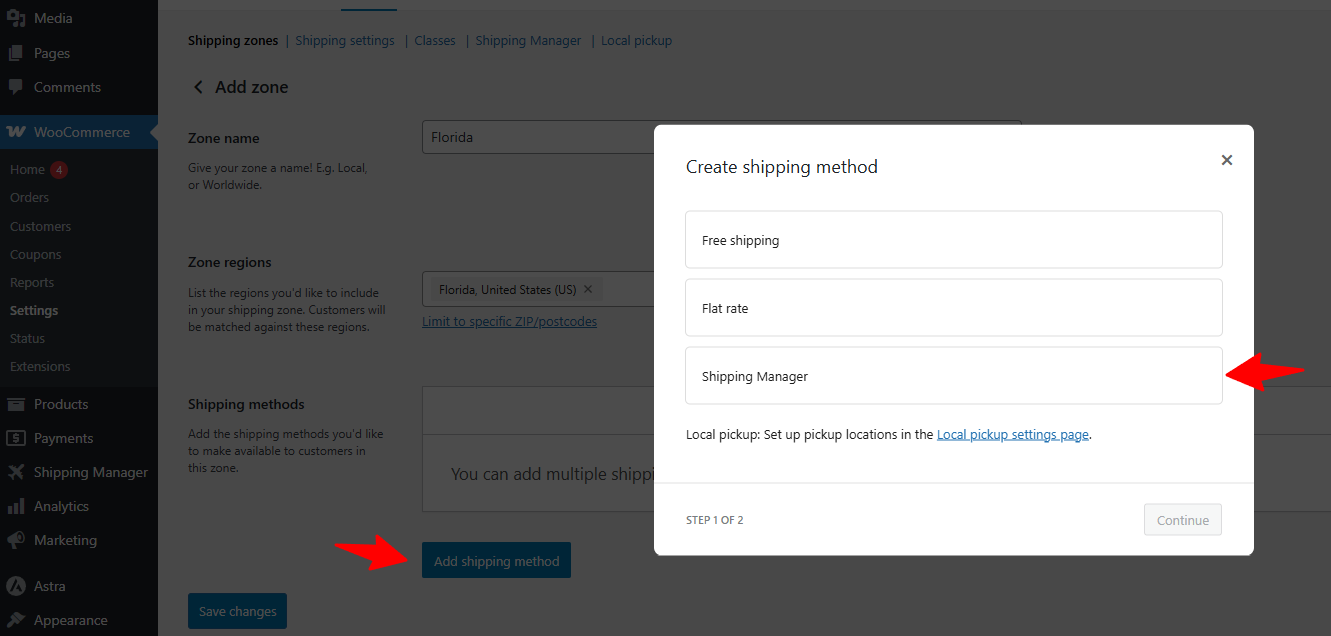
-
Click 'Continue' after selecting 'Shipping Manager' from the list.
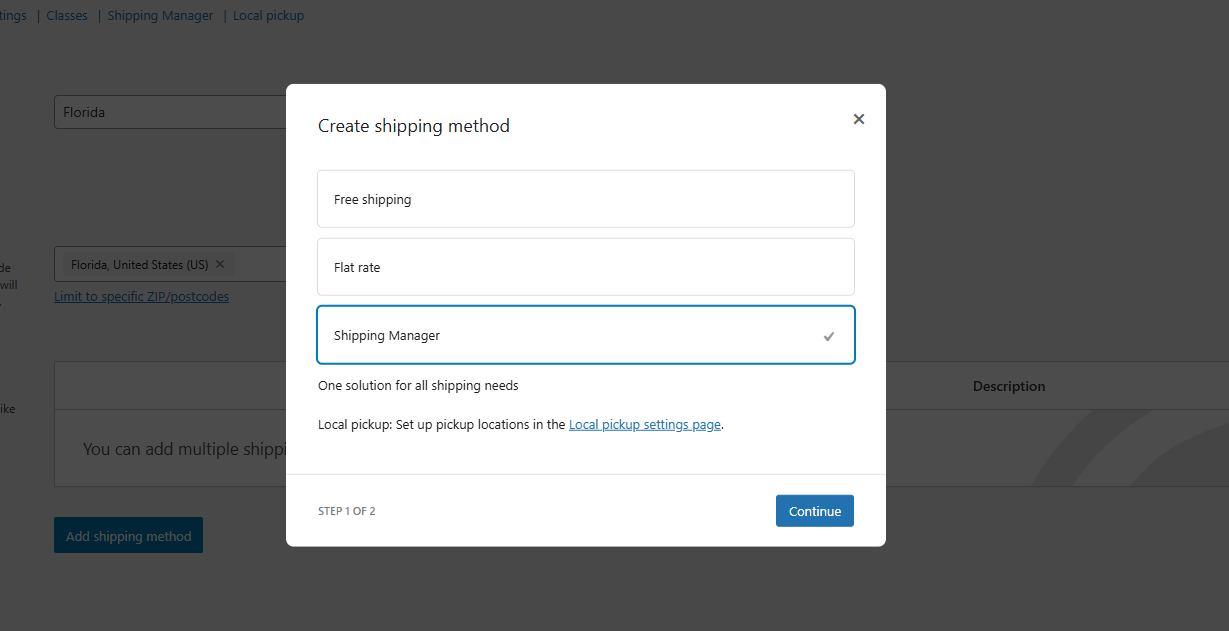
-
In the Shipping Method, you can now see the Shipping Manager. View by clicking on Edit.
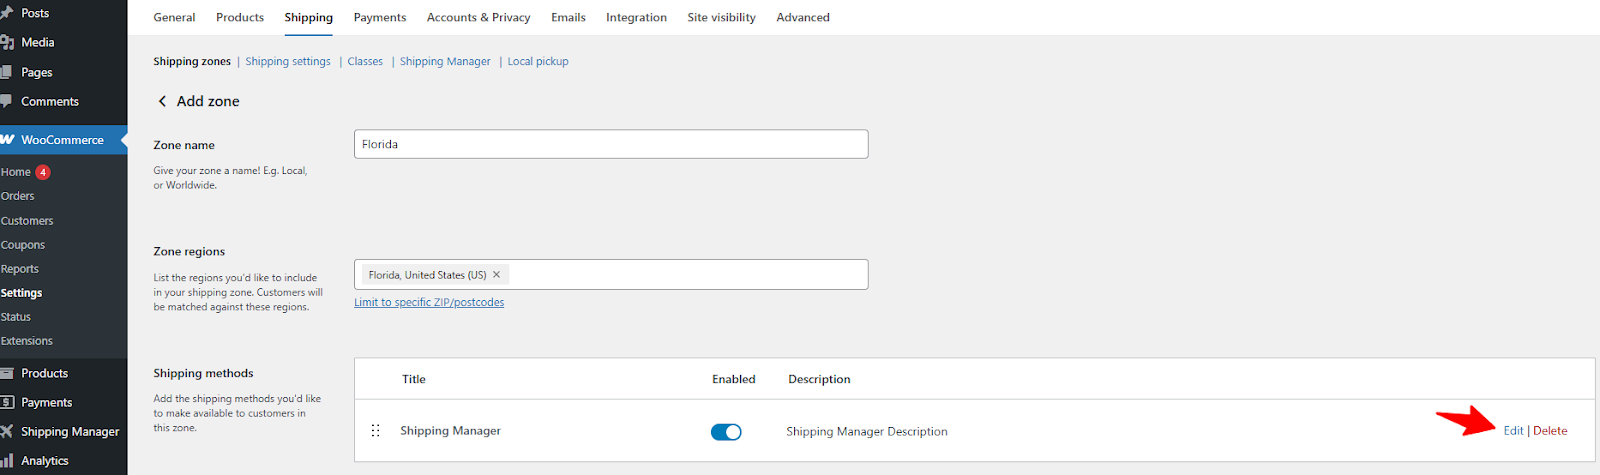
Configuring Shipping Manager:
As you can see, zone-specific shipping methods are now available for Florida.
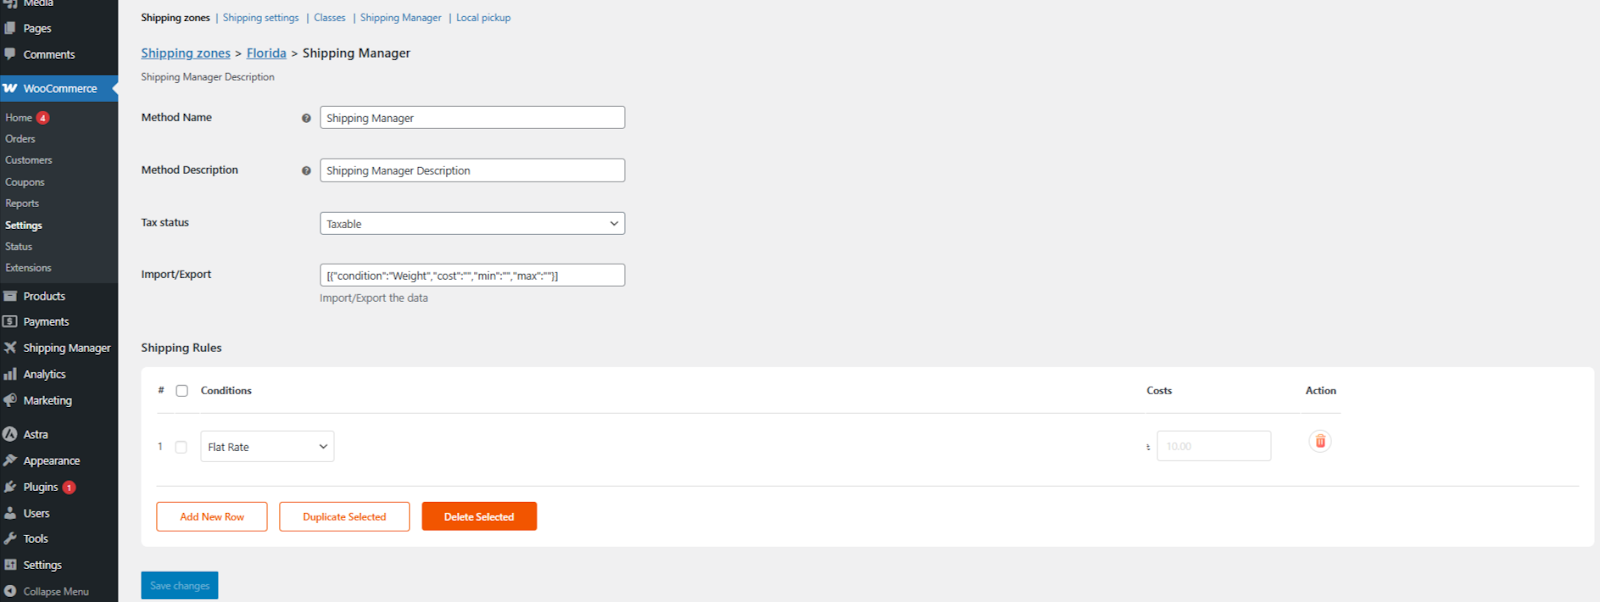
-
You can modify the Method Name, Method Description, and Tax Status from this page.
-
Additionally, you can set different shipping rules and conditions for your WooCommerce store.
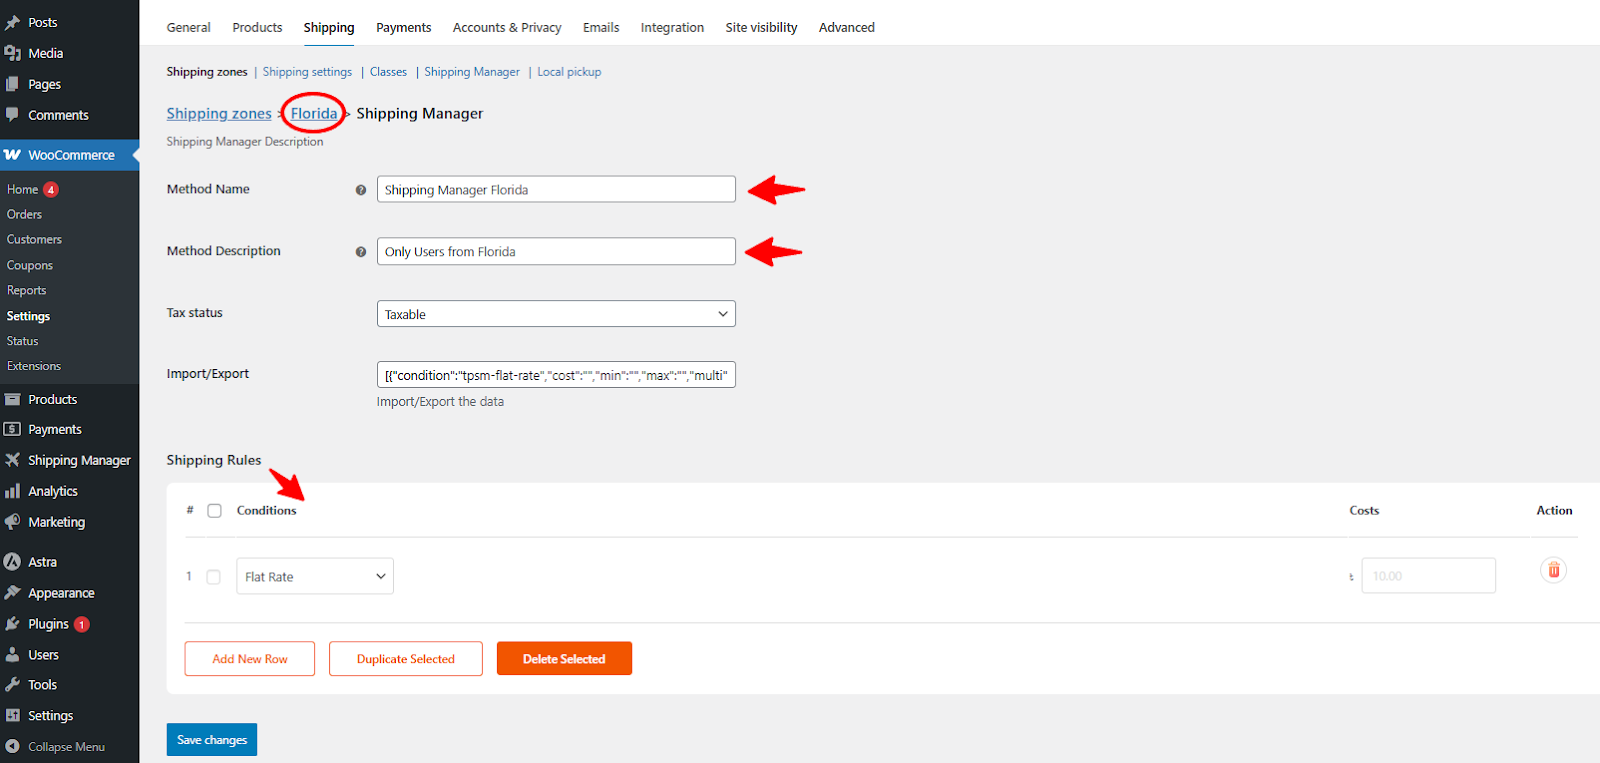
-
You can now view the list of shipping rules and select a Shipping Class from the list.
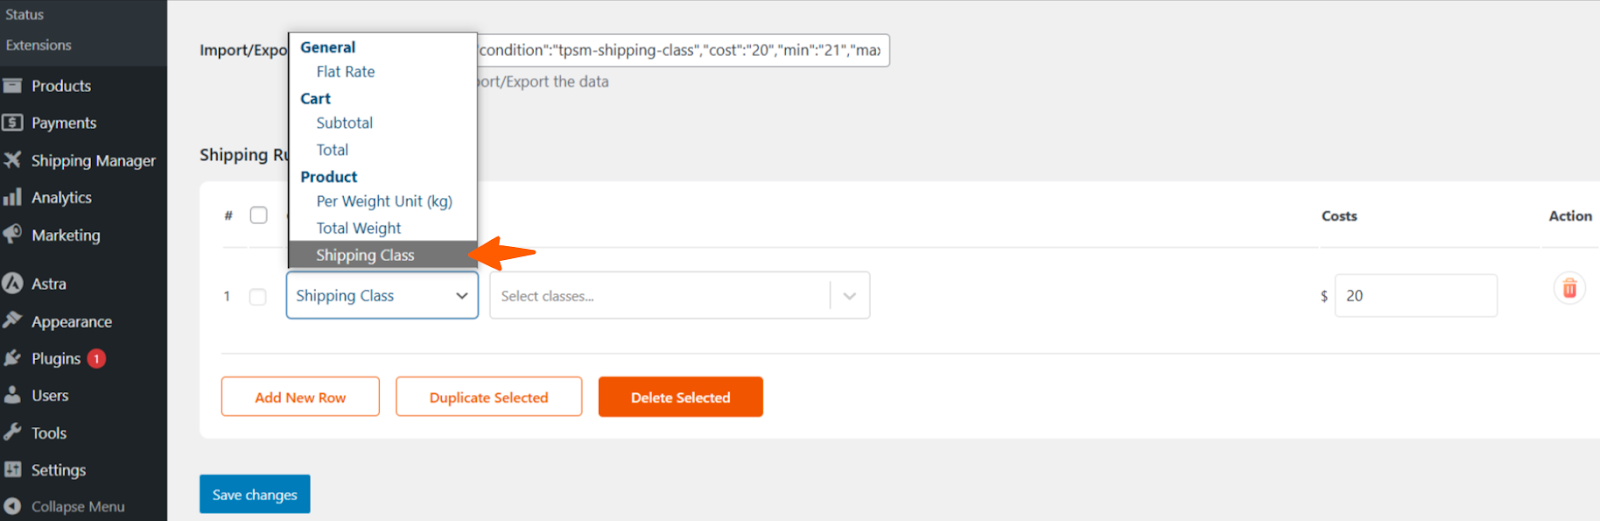
-
Now, you can select a class in Shipping Manager since we’ve already created WooCommerce classes.
-
You can see that we picked two separate instances of the WooCommerce shipping classes. The first class is Heavy, and the shipping cost is set to $50.

-
The second class is Light, and the shipping cost is set to $30.
Now, we will verify that the class-based shipping fees are functioning correctly at checkout.
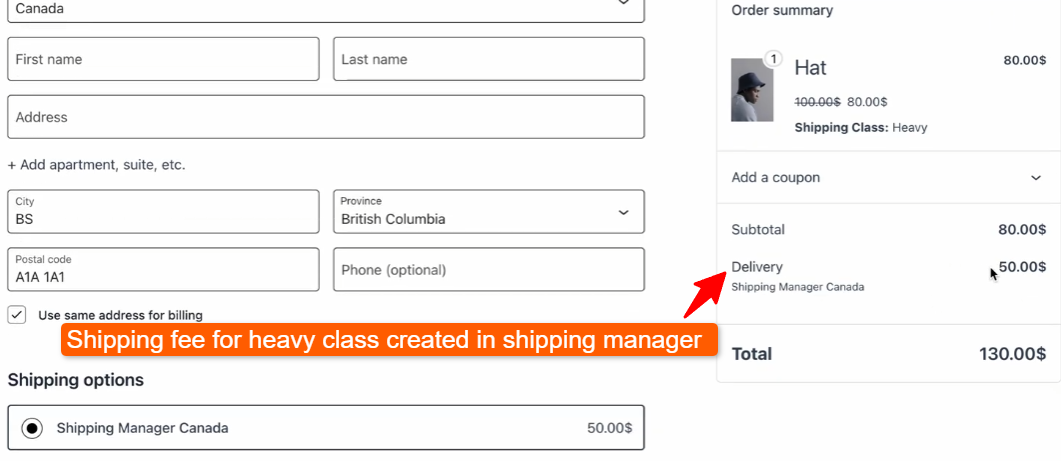
WooCommerce Shipping Class in Effect at The Checkout
Let's take a recap before proceeding to this step. We’ve taken the following steps already:
-
Set variable products
-
Created two WooCommerce shipping classes
-
Set the shipping classes and fee at Shipping Manager
Let’s verify if our WooCommerce shipping classes and related fees are functioning correctly.
-
Now, go to your store, select the item you want, and click the "Add to Cart" button.

-
There are two options in the Shipping class that you can choose from. Click the "Add to Cart" button, then click "View Cart" or go to the "Checkout" page.

Now you can see the shipping fee is $50, which was set on the Shipping Manager plugin. This means the shipping fee is working as expected.
Similarly, the shipping fee will be $30 if you select the shipping class for the lightweight product.
How to Manage WooCommerce Shipping Classes Effectively
Creating WooCommerce shipping classes and rules are just half the equation. Managing them effectively is the key to maintaining long-term efficiency, accuracy, and customer loyalty. Following the best practices can help prevent confusion, overcharges, or lost profit opportunities.
Here’s how you can take the smarter approach to managing WooCommerce shipping classes:
Simplify and Optimize with WooCommerce Shipping Classes
Keep your setup simple by avoid creating classes you don’t need. Stick to clear, functionalist categories that correspond to the central shipping differences. For example:
-
Light
-
Heavy
-
Fragile
-
Oversized
You can consistently classify products into different classes within your WooCommerce store. The shipping manager makes the entire process easier by assigning accurate shipping fees to different classes.
Use Logical and Consistent Naming
Name your WooCommerce shipping classes in such a way that everyone can easily understand them. Avoid creating generic or internal-only names such as “Class A” or “Class B.” Instead, provide intuitive names such as:
-
Heavy Equipment
-
Small Accessories
-
Perishable Items
Provide a descriptive name to reduce confusion and minimize the risk of human error. This is helpful when you have multiple administrators for your store.
Document Your WooCommerce Shipping Class Rules
As your store grows, it becomes increasingly difficult to keep track of which classes have specific shipping rules. Keep a basic spreadsheet or an in-house document that includes:
-
Class name
-
Purpose or criteria
-
Associated fee per zone
-
Rules set in Shipping Manager
Your entire team should have this list as a reference for managing the store more flexibly.
Periodically Audit and Update Class Assignments
Products are changing frequently, and vendors are changing the packaging process. With that, shipping companies are changing their shipping fee. That's why it's crucial to take the following steps:
-
Review your product catalog
-
Check if shipping classes still apply accurately
-
Update class assignments where needed
The Shipping Manager plugin makes this easy by allowing you to revisit and adjust rules zone-by-zone and class-by-class without having to redo everything.
Combine Shipping Classes with Zone-Specific Logic
Shipping costs often vary depending on your location. Don't use a one-size-fits-all rule, and use Shipping Manager to combine class-based logic with shipping that is specific to a certain zone.
This way, you can charge:
-
$30 for “Light” products within your home state
-
$50 for the same class when shipping internationally
This level of precision ensures your pricing remains competitive and profitable across all regions.
Final Thoughts on WooCommerce Shipping Class Setup
WooCommerce shipping class is a powerful way to automate shipping costs, secure margins, and keep your buyers happy! When you use it via the Shipping Manager plugin, you get an intelligent shipping system that scales with your WooCommerce store.
If you invest the time and effort to set up your shipping classes correctly, you will receive fewer customer complaints. Additionally, you can focus on other crucial business aspects rather than dealing with unnecessary cart abandonment due to inaccurate costs.
Begin by reviewing your best-selling items and categorizing them into distinct WooCommerce shipping classes. Feel free to contact our support team if you are unable to set a class-based shipping fee using Shipping Manager.
FAQs (Frequently asked questions)
Q. What are WooCommerce shipping classes?
Shipping classes group products with similar shipping requirements (e.g., weight, fragility) to apply specific fees. For example, "Heavy" items can be set to cost $50, while "Light" items cost $5.
Q. Why should I use shipping classes in my WooCommerce store?
Shipping classes enable you to control costs, enhance shipping accuracy, and streamline the checkout process, particularly when handling products of varying sizes or weights.
Q. How do shipping classes differ from shipping zones?
Shipping classes = Product-based rules (e.g., fragile, heavy). Shipping zones = Location-based rules (e.g., domestic vs. international).
Q. What if a customer buys products from different classes?
WooCommerce calculates fees for each class in the cart. Example: A "Heavy" ($50) + "Fragile" ($10) item = $60 total shipping.
Q. Can I offer free shipping for specific classes?
Yes! Set the class cost to 0 or use the Shipping Manager plugin to create conditions (e.g., "Free shipping for ‘Light’ items over $50").
Q. Do I need plugins for shipping classes?
The built-in WooCommerce features work for basic needs. For advanced rules (weight + class + zones), plugins like Table Rate Shipping are recommended.
Q. What’s the biggest mistake to avoid when it comes to WooCommerce shipping classes?
Not assigning classes to products! Unclassified items use your default shipping rates, which may undercharge for heavy/fragile items.
Q. Can I assign different shipping classes to product variations?
Yes, WooCommerce allows you to assign shipping classes to individual variations in variable products, ensuring accurate shipping fees per option.
- Multiple shipping options in WooCommerce
- WordPress Maintenance
- WordPress Security
- WordPress SEO
- WordPress website security
- AI SEO tools vs traditional tactics
- High-converting landing pages in WordPress
- Implementing WooCommerce Subscription
- WordPress Admin Security Measures
- WordPress maintenance checklist
- Fixing WooCommerce Shipping Issues
- Best free WordPress 2FA Plugin


